Uniform Care
Uniform is issued to cadets on a temporary basis: it belongs to the Royal Air Force throughout the time that you loan it, which is until you hand it back in at the end of your cadet career, or when you outgrow it.
It is of utmost importance to look after your uniform until it is handed in. Responsibility lies with the cadet, not their parents, to keep uniform in a clean and serviceable manner!
It is also good practice to learn how to iron and look after your kit yourself. If you get into the habit of getting parents, grandparents or anybody else to look after it for you, when you go away on activities, you will find that you cannot look after your own kit, and so will score very low on inspections.
- Beret
- Brassard
- Blue belt
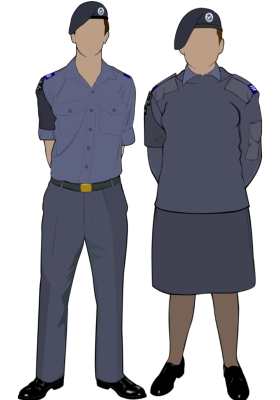
- RAF blue jumper
- RAF blue trousers / skirt
- Parade shoes*
- Black socks* / nearly black tights*
- Wedgwood shirt and tie (Windsor knot)
- Beret
- Brassard
- Blue belt
- RAF blue jumper
- RAF blue trousers / skirt
- Parade shoes*
- Black socks* / nearly black tights*
- Dark blue shirt
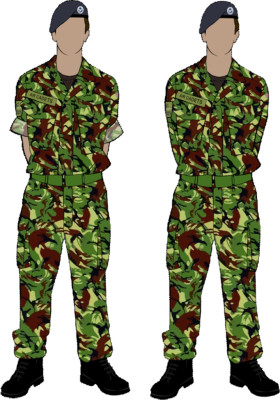
- Beret
- Olive green (OG) t-shirt*
- MTP or DPM shirt†
- MTP or DPM trousers†
- Olive green belt†
- Thick black / olive green socks*
- Black assault boots (Brown for MTP)*
- MTP or DPM smock†
MTP is the newer style pattern for No 3 uniform; it is likely that DPM will be phased out in the near future.
* Must be bought privately.
† May need to be bought privately.
Beret and Hair
Beret
The beret is to be worn with the band horizontal across the head and 1 inch (2.5 cm) above the eyebrows. The badge must be above the left eye and must not be obscured when viewed from the front.
Before you wear you beret for the first time it needs to be shaped. To do this put a little cold water in the bath and hot water in the sink. Without getting the leather band wet, alternatively immerse the beret in the hot and cold water. In between each hot and cold cycle put the beret on your head, holding the badge and pulling the excess material towards your right ear. After several attempts it should be the right shape. If you can, wear the beret until it dries, so it moulds to the shape of your head.
Hair
A male’s hair must be kept short with no hair touching the collar of the shirt. Females need to arrange their ‘hair in a manner which permits the uniform headdress to be worn correctly’. No hair is allowed to stick out the front of the beret and is not allowed to touch the collar on the shirt. A hair ribbon can be worn in the form of a bandeau, but it needs to be a similar colour to the hair or black.
Jumpers
The jumper is to be kept clean and in a good state of repair (no holes). The epaulettes should be damp pressed and the cuffs should be worn turned back.
If your jumper starts to get ‘fluffy’ due to washing, then remove the fluff with a razor (taking care not to rip the jumper) or a de-fuzzer. You can still needs iron your jumper on a warm setting, but remember NO creases.
Shirts (Working / Wedgwood Blues)
Both your Working and Wedgwood blue shirts should be cleaned and well ironed at all times, with a single crease in the sleeves. In order to get the correct crease; ensure the crease goes from the centre of the epaulette to the furthermost pleat from the button at the end of the sleeve.
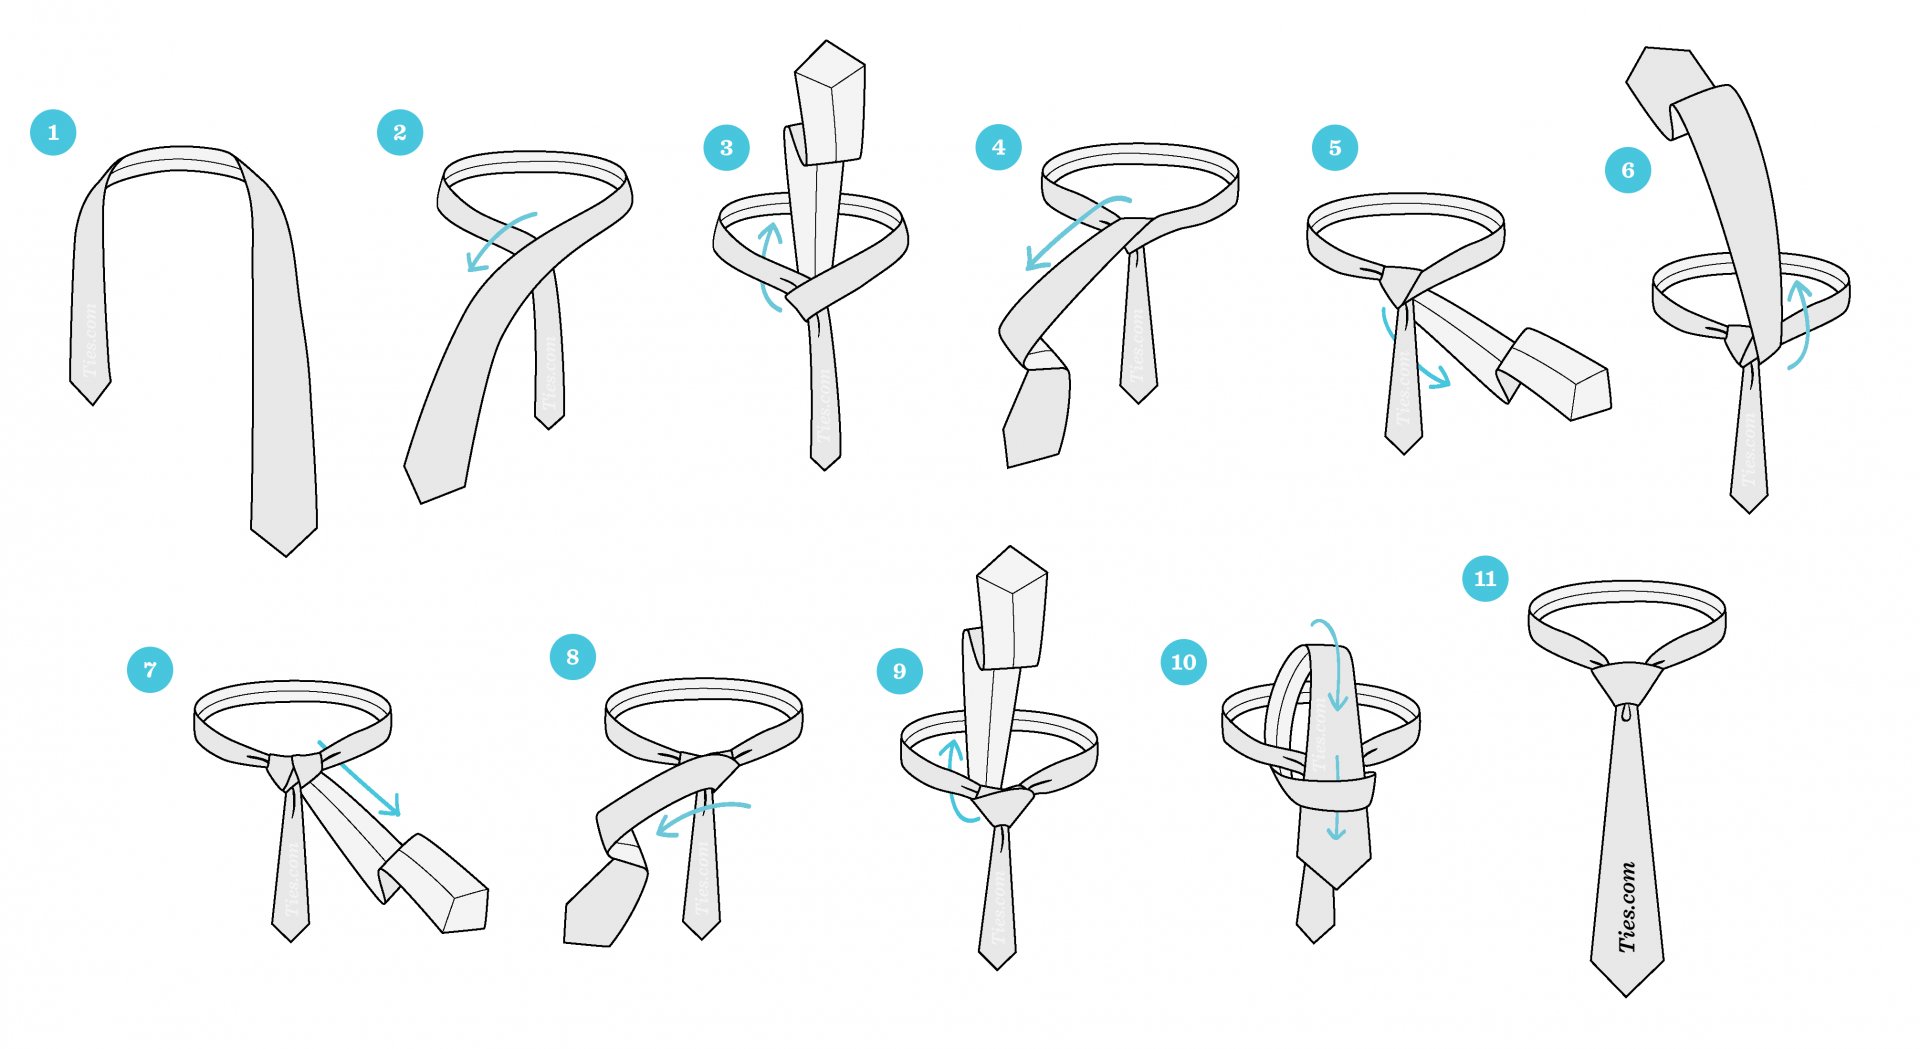
Tie
The tie should be tied in a Windsor knot. Instructions on how to do this are below. Click on the image to make it larger. If you ever have to iron your tie, do it on the reverse on a cool setting.
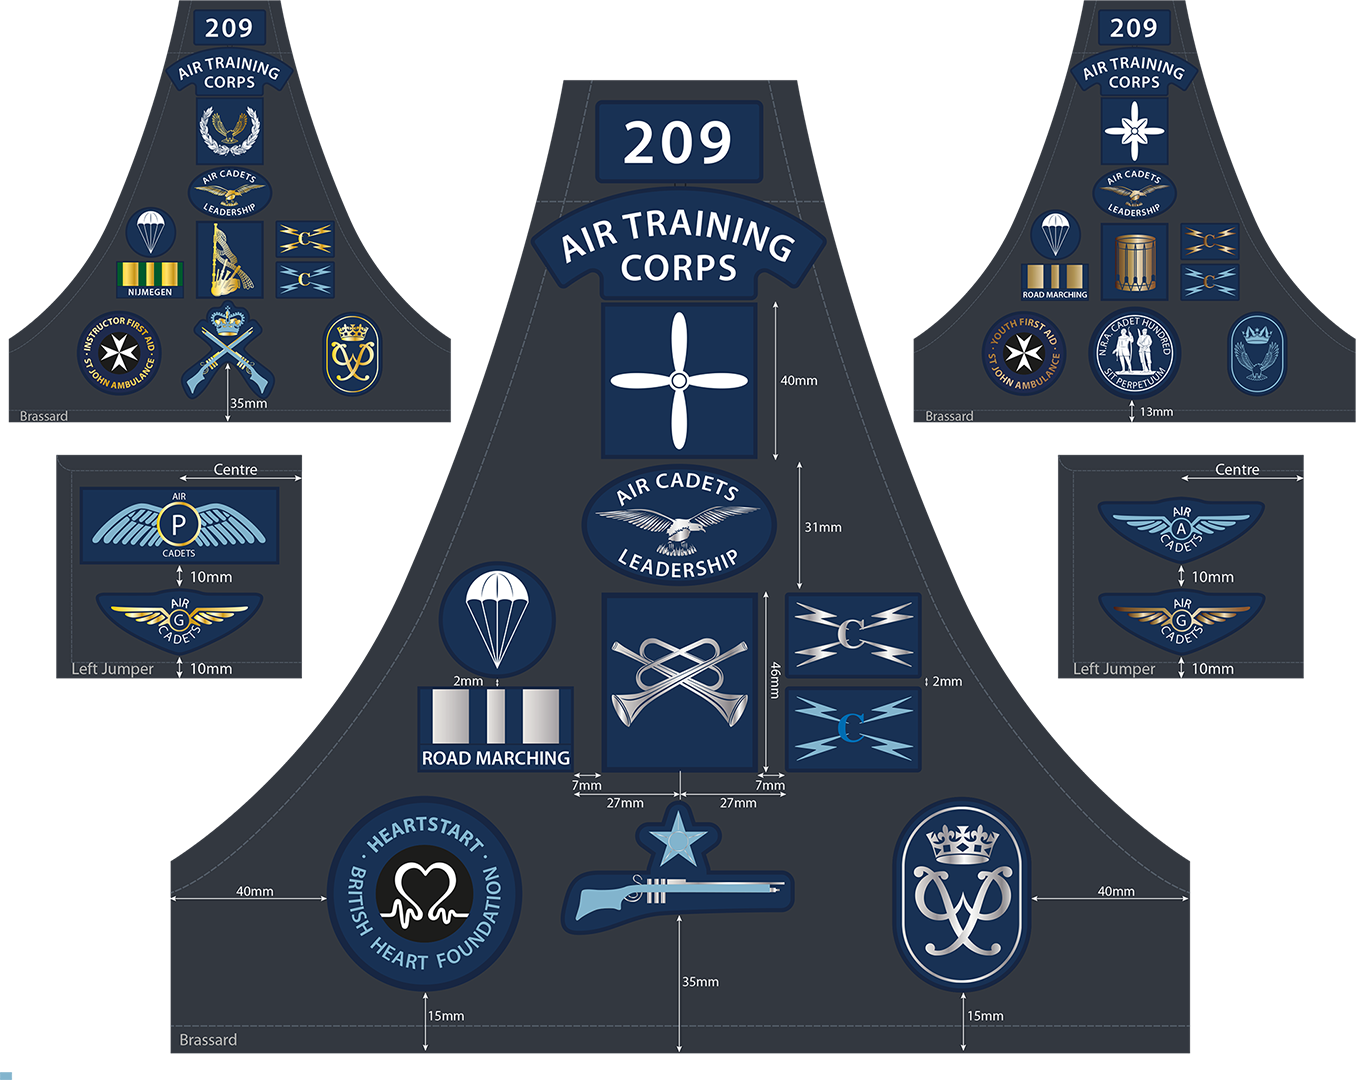
Brassard
Your brassard should not have any creases in it and should be occasionally ironed on the reverse side to iron out any creases. The brassard badges need to be positioned correctly: Examples of how to do this can be found below. Your brassard should have no creases on it and will need to be ironed flat. Do this on a warm setting. If the iron is too hot, as with all clothing, the material will go shiny.
Trousers
Trousers are to be kept in a clean and well pressed condition at all times. Creases are to run down the front and back of each trouser leg. A good way to get better creases is to put a little bit of dry soap along the creases on the inside of the trouser leg. When you iron the trousers it acts like glue and makes the creases sharper. The aim is to get sharp crease all along the front and back of the trousers.
Skirts
The skirt should be pressed to ensure a crease-less finish. One if the best ways to remove creases from a skirt is to simply hang it for a while for the creases to drop out, but occasional ironing may be necessary. Your skirt may not have a pleat down the middle like the one in the video.
Tights and Socks
Tights
The current regulation colour for tights is ‘nearly black’.
Socks
Socks must be black and no other colour with no logos, stripes, or anything added to them.
Shoes
Male shoes should be bulled on the toecap, then polished to a good shine on the body of the shoe. Welts should be free of dust, and the shoe must not be ‘cross laced’ Female shoes should be bulled at the front of the shoe and polished to a good shine on the body. Visible areas of the sole should be kept clean. These shoes should also neither be ‘cross laced’.
Some people feel that the best polish to use for parade shoes is Kiwi parade gloss. Others prefer to just use normal Kiwi black polish. First, remove and dirt or dust by running the toecap under a cold tap for a few seconds. Then boil the kettle and fill a cup about a quarter of the way up. Fill the rest of the cup with cold water. The water should now be warm, but not hot. If you put your little finger in the water it should be comfortable. Next, get a small piece of cotton wool and dunk it in the water. Squeeze off any excess and now rub it in the polish. (Don’t put too much on, or it will take too long to get a shine!). Dunk it in the water again, and then rub it on the toecap in a circular motion. Keep doing this until a definite shine appears. Only press lightly for this, as too much pressure will rub off more polish than you put on! Once you have a shine keep repeating the process, with new pieces of cotton wool, until your shoes are really shiny. For the toecaps it should take about half an hour for each shoe. When you are comfortable with the process try to alternate between clear polish and parade gloss. This will help your shoes become even shinier! Once you have finished polishing run the toecap under cold water to remove any water droplets. For the sides of the shoe use the same process. However, they don’t need to be as shiny as the toecaps. It should take you about 10 minutes per shoe for this.
Jewellery and Make-Up
Jewellery and watches may be worn as long as they are not visible. Girls may wear discreet makeup and one simple gold stud on each ear if their ears are already pierced. Only engagement or wedding rings are to be worn.